If you’re like me, then you tend to generate a LOT of client documentation on your client-facing engagements. And as much as my clients show their appreciation for my efforts, they rarely reference or provide these documents when asking for support or modifications down the road. This means that it is up to me to organize and catalog my documents for quick reference while addressing client inquiries.
Over the years, I have developed a number of templates to help with documenting and managing these types of efforts, but quickly finding past documents can be challenging. I wanted to be able to quickly find documents by topic, by client, or by client contact person — or some combination of all three. I developed a rather simple approach for doing this which utilizes MS Word Document properties and form fields.
A bit about document properties
In Windows, most files have different properties. See for yourself; in windows explorer right-click on a file — any file — and select the ‘Properties’ option. Then click on the ‘Details’ tab. You should see some file attributes, including Name, Type, Size, and Date Created. Most files will have these basic attributes. However, some files — such as MS Office documents — have additional attributes that can be populated by the user. These attributes include Title, Subject, Categories, and Authors. They’re definable by the user and available in Windows Explorer for searching and sorting. More on that later.
Document properties in MS Office
 Those same document properties you found through Windows Explorer are also modifiable directly in MS Office. For the sake of my example, I’m going to use MS Word 2010. With your document open, go to the ‘File’ tab. On the right side of your screen, you will see the document properties. Any light-gray Hyperlink that starts with “Add” will allow you manually maintain these document properties. Initially, MS Word will show a limited number of properties; you can select the “Show All Properties” hyperlink to show a more complete listing.
You may be thinking to yourself, “Big deal; so you can update properties. So what.” Well, you can actually embed these property fields in your template. This allows you to quickly update these properties without ever having to leave the main Word composition screen. Let’s look at an example from my template.
 This is a screenshot of a table from a ‘Process Design’ template that I frequently use to instruct users on how to perform business processes. This section of the document is intended to collect high-level information about the process in question: The name of the process or process area, the client who the document is targeted to, the Owner or the document, and the Requestor at the client who I’m building the document for. Inside the table, you will notice several light-gray colored bracketed labels which, in most cases, are the field names of the document properties.
  You can click on the label and override the bracketed dummy value with the actual value for the field. In the example in the adjacent screenshot, I am modifying the ‘Title’ property which will serve as the document’s ‘Name’ in my template.
 I continue to fill in the fields. You will notice that I am populating certain fields which are NOT document properties. You can create custom fields and properties in which to store additional information; that’s for another post, perhaps.
Adding new document properties to your form
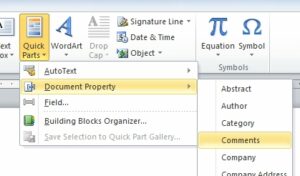 Now, let’s say we want to have the existing “Comments” area map to the “Comments” document property. This could be perhaps an area to capture status information during the development of the document. To insert this property, navigate to the ‘Insert’ tab. Click on the ‘Quick Parts’ menu and select Document Property > Comments.
  If this document property is currently empty, you will have inserted a bracketed [Comments] label. You’re done. You can now modify this field like you can the others.
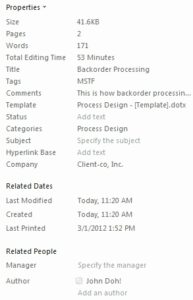 If we now look at our document properties in MS Word, you should see the values you typed into the fields — including the new comments field. Each time you modify these fields the properties are updated in real-time (as long as you save the file).
Now, you’re probably thinging, “ok, that’s pretty neat, but how do I take advantage of this in Windows Explorer like you said above?”
Document properties in Windows Explorer
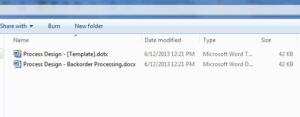 The default folder view contains a basic set of Properties for you to work with, such as Name, Date Modified, and File Type. I have created a new folder on my system and have saved my template file as a .docx file. But I am still only seeing the basic document properties. To display additional properties, right-click on the header bar where it says “Name”, “Date Modified”, etc.
 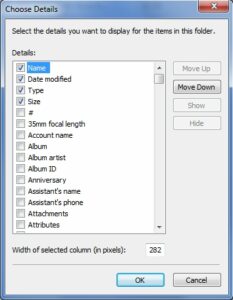 You will see a small selection of commonly used fields to add to your explorer window. Click on the “More…” option and you will see the complete list. Next, select all the fields you wish to include in your explorer window. I selected ‘Company’, ‘Authors’, ‘Title’, and ‘Categories’. Once you hit ‘OK’, you should see these columns in your explorer window. You can drag-and-drop the columns to arrange them in your preferred
  order. Like any other column in Explorer, you can click the column header to sort in ascending or descending order.
What I have also done is use the “Categories” field in the header of my template. This is where I specify if this document is a “Process Design”, “Functional Specification”, “Work Instruction”, or “Configuration Document”.
The document properties fields are also searchable. This means that when you perform a search in the Windows Explorer search field, results will include hits from the document properties fields.
This brings me to my last tip. One of the attributes I have not mentioned yet is “Tags”. The “Tags” field can contain one or more words or phrases separated by a semicolon. The field is completely open for use, so you can use them in whatever way works best for you. What I have chosen to do is come up with a short, unique sequence of characters (“MSFT”) that I have included in my template and is subsequently maintained in all of my customer documentation using this format. This allows me to do a text search for “MSFT” on my entire computer and return all documents in one window. Since the word “MSFT” does not appear anywhere else, It will only show the documents I wish to see.
Wrap-up
This approach has proven a simple, effective way to catalog my client documentation and a great way to quickly find what I’m looking for. I am able to quickly find documents I’ve written for one client, swap out a few fields and change a few screenshots and have a customized document ready for another.


