
I initially intended for this series to conclude after three parts, but some additional topics popped up which I felt justified a 4th installment. This article will be a grab-bag — a potpourri, if you prefer — covering a variety of post-installation thoughts ranging from Windows 10 to common activities you should be aware of. Welcome to the SAP ECC 6.0 IDES Appendix.
SERIES RE-CAP
If you’re just joining this series, I recommend you review the previous articles in which I cover my approach, prerequisites, and initial VM setup (Part 1); VM server preparations (Part 2); and the installation of Oracle and SAP, as well as the first logon (Part 3). The following sections contain separate topics that I wanted to further explore. If you have a suggestion for additional topics, please let me know in the comments.
SAP IDES Clients
When I previously tested my SAP installation, I logged into client 001. However, for day-to-day testing you will probably want to use one of the OTHER clients which exist in your new system. Here is a list of all the clients that exist:
| Client | Name | Description |
| 000 | SAP AG | Accessing this client should be generally avoided unless specifically instructed to do so by SAP. |
| 001 | SAP AG | This can probably be considered the ‘Golden Client’ where development occurs; no data exists here. |
| 066 | early watch | Used for monitoring purposes; can generally be avoided. |
| 800 | IDES-ALE: Central FI Sys | This is the main client where the IDES model is maintained. |
| 810 | IDES-ALE: Sales System | A smaller client with specific ALE examples. See the note referenced below for more info. |
| 811 | IDES-ALE: Production | A smaller client with specific ALE examples. See the note referenced below for more info. |
| 812 | Logistics | A smaller client with specific ALE examples. See the note referenced below for more info. |
At first glance, it appears that client 800 is going to contain the bulk of data and configuration — ideal for day-to-day configuration and testing activities. SAP offers some additional details in SAP Notes. Note 2209434 states, in part:
7. Usage/User
The data of the IDES model company can be found in client 800. The clients 810,811,812 are very small and contain examples for ALE scenarios. In the clients 000/001 you can logon with DDIC and SAP* with the password you have defined at the beginning of the installation as ‘Master-Password’, in the clients 8xx with the password 19920706 / 06071992 and in all clients with IDADMIN / ides The system already contains more than 20 languages. Set the system profile parameter zcsa/installed_languages accordingly to use them.
Now that we know which clients exist, let’s talk about how to access them. The default accounts which you may already be aware of — DDIC, and SAP* — exist in all of the above clients. However, only clients 000 and 001 use the default password you setup during the installation. You’ll want to use the table below to find the pre-defined passwords in your IDES clients:
| Clients | User ID | Password |
| 000/001 | DDIC | [Default during Installation] |
| 000/001 | SAP* | [Default during Installation] |
| 000/001/800/810/811/812 | IDADMIN | ides |
| 800/810/811/812 | DDIC | 19920706 |
| 800/810/811/812 | SAP* | 06071992 |
Now we know the available clients, what they do (roughly) and how to access them. Awesome.
NOTE: You may wish to change the default client to 800 so that you don’t accidentally log on to a different one. There’s a quick guide on how to do this here.
Org Structure
Now that I’ve chosen client 800 as my preferred client, which org structure should I use for configuration and testing? I could, of course, create my own org structure (which I may do at some point). But, there is one that I have used in other IDES systems with great success.
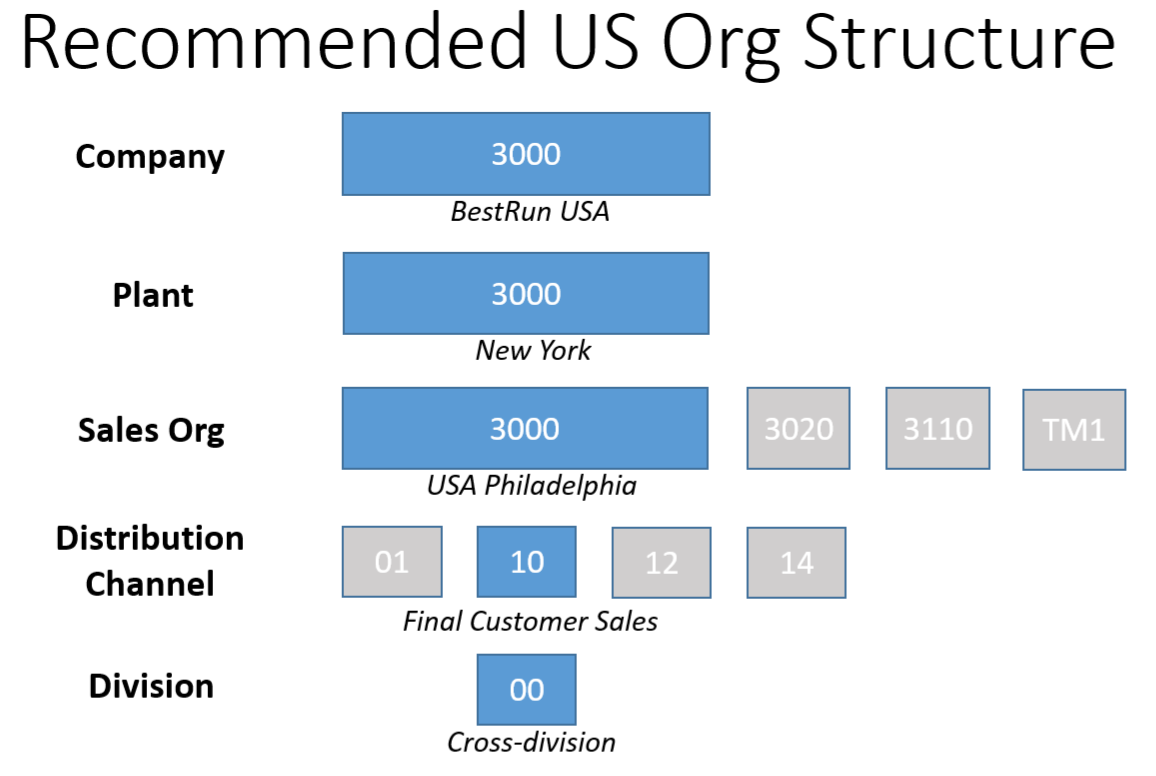
The above structure contains customers and materials for you to use in your configuration and testing. You should be able to use SE16n to find customers (KNVV), materials (MVKE) and Sales documents (VBAK) within this structure.
Licenses
The SAP Note referenced above (Note 2209434) contains a couple of comments about licenses:
-
4. License-/ contract conditions
The installation package is available for free for all customers and partners with a valid license for SAP ERP 6.0 and the specific database. -
8. Post Installation
After the succesful installation of the IDES system you have to install your own license using transaction SLICENSE.
Unfortunately, I cannot speak to IDES licensing intelligently. I don’t know how someone could acquire an IDES license independently from customers and partners. I also cannot speak to whether (or how) the current installation is crippled without updating the license. I am able to log into the system now and create transactions, but I assume that at some point I will not be able to do so.
UPDATE (12/10/15):
An additional note about the license. The ECC 6.0 IDES system is installed with a 3-month temporary license, during which time (it seems) the product is fully functional. As you approach your license expiry date, you will start to see warnings upon system. If you are outside your license validity period (either before or after) you will not be able to log on with a normal system user. If you wish to retain use of your SAP server without the hassle of acquiring a license, here are some thoughts:
- The most convenient way, of course, is to request a new license key from SAP. However, this would require that you have a valid S-number with authorization to make such a request (I do not). IDES keys are available to SAP customers and partners with valid installations of IDES.
- If you’re thinking that an ECC 6.0 license can be hacked in any way, I’ve read that SAP requires the use of an SAP-provided, PGP-encrypted file (their “New License”) which is tied directly to your SAP installation number. I welcome you to correct me if I’m wrong, but I would say that there’s no way to bypass their licensing process.
- From what I can tell, once you install SAP using the default license, you must stay within that 90 day period in order to use the system.
- You can, however, change the server date to consistently remain within that period. This is probably best achieved if you are using SAP within a Virtual Machine. This could pose some problems when dealing with some date-sensitive processes; you obviously don’t want to start a scenario and then have to change the system date during.
- Alternatively, you can create a VirtualBox snapshot just before installing SAP. Every three months when you approach the expiry date, all you have to do is revert back to your snapshot, install SAP and have a fresh box for the next few months. You will of course lose whatever data and configuration you have created. I suppose you could turn on Transports (in SCC1, I think) and store them off-system to make that a bit easier to re-create.
Many of these ideas are not best case scenarios, but they should help you keep your SAP installation around a bit longer. Let me know if you’ve found any alternatives.
Windows 10 and VirtualBox
After my initial draft of these articles, I decided to try updating my host machine to Windows 10. While the update itself worked just fine, it broke my VirtualBox installation. Thankfully, the latest version of VirtualBox (v5.x) seems to run fine under Windows 10. So, if you are using a Windows 10 host machine or plan to upgrade you may want to go ahead and use the latest version of VirtualBox.
HOWEVER, I’m seriously re-considering my decision to use Windows 10. One of the caveats for using Windows 10 is the mandatory installation of Windows 10 updates. It’s not the updates that I mind, but rather the automatic reboots required after most updates are installed. As mentioned in the last article, shutting down and starting up SAP are not trivial activities and I fear some challenges when Windows decides to restart itself without my VM being aware of it. Perhaps the virtualization can handle this type of unexpected shut down; perhaps not. What I will try to do is use the ‘Defer updates’ setting to see if this will reduce the number of updates required. Fingers crossed.
VirtualBox Snapshots
Speaking of VirtualBox, what should we do with all those Snapshots that we made during the installation? The answer is, of course, up to you. I ended up with 3 or 4 separate snapshots during my installation. Since things seem to be working well, I am planning on keeping only two of them: My ‘Squeaky-clean Server’ image for use on other projects, and the one taken just after my first SAP logon. And what I’ll probably end up doing is “cloning” my squeaky clean server to separate it from the SAP VM at which point I can delete the original one.
Hardware
While my aging Dell desktop runs my SAP Server, I’ll be honest: It’s not the fastest thing in the world. The Dell was a good ‘proof of concept’ system, but it is not a machine that I can dedicate to using as a full-time server in the long term. Also, I use this machine for other processor-intensive uses such as music recording and as a workstation for an occasional Adobe Illustrator project. Since this server is something I wish to have available for a while, I decided to move the installation to a beefier system.
I decided to re-purpose a slightly newer, unused Shuttle XPC media center PC as my SAP server. I put a fresh installation of Windows 10 on it and can completely dedicate this to my SAP server project. It also uses a newer Intel i3 processor and has 4 DIMM slots to load up with enough RAM to give you goosebumps. I’ve upgraded its 500 Gb HDD in favor of two 500 Gb SDD’s (solid state drives) to drastically improve read/write speeds, reduce power consumption and lessen noise. It’s quiet enough that I can afford to leave this running all day in the corner of my office without being a distraction. Installing Oracle and SAP on this setup took about 8 hours instead of 12+ on my old box.
Remote Desktop
I travel a decent amount and would like to be able to access my SAP installation while on the road — or while being lazy on the couch. To best accomplish this, you’ll probably want to do a couple of things:
First, you’ll want to make sure that you are leveraging the “Bridged” networking option in your VM configuration on the host machine. What this does is provide your VM with its own IP address. My understanding is that the host machine effectively acts as a router, parsing traffic and routing it to your VM when needed. You can use the ‘ipconfig’ command at the command prompt to find your VM’s IP address.
Next, you need to make sure that you have Remote Access enabled on your VM. From the Start menu, search for ‘Allow Remote Access’. Select the option that says ‘Allow Remote Access to your computer’. A new window will appear. Under the ‘Remote Desktop’ section, select either (a) ‘Allow connections… running any version’, or (b) ‘Allow connections… with Network Level Authentication’. Option (a) being less secure and (b) being more so. Click “OK”. You may get a Firewall message, but that should be switched off anyway.
Next, you’ll want to enable port forwarding on your home router to send Remote Desktop traffic to your VM. How to do this will depend on your router, but you’ll need to log into your router’s front end configuration tool and find the ‘Port Forwarding’ settings. You will need to forward port 3389 to the IP address of your VM. There are guides-a-plenty on how to do this online. Just Bing it.
If you want to access this server from outside your local network and you DON’T have a static IP address you’ll probably want to setup a Dynamic DNS service. If you’re asking yourself “Do I have a static IP address”, then you probably don’t. Your home internet IP address will change periodically, but a Dynamic DNS (DDNS) service will provide you with a domain name you can use and it will automatically map that domain with your current IP address. That way you only have to keep track of your Domain name and not some silly IP address that constantly changes. Make sense? There are several free DDNS services out there. NOIP.com seems to be a popular choice. Here’s roughly what you’ll want to do if you’re new to DDNS:
- Sign up for the free service, create a user name. You’ll probably have to do the whole email address verification thing.
- Choose a domain/host name — something easy to remember. You’ll end up with something like:
YourHostName.no-ip.com
…or…
YourHostName.ddns.net
- Download and install a special app from the DDNS provider (may be called an ‘Update Client’) and install it on your host machine.
- Launch the app and log in with your user id and password.
- That’s about it. The client will periodically send your internet IP address to your DDNS provider and it will be constantly updated.
Finally, you’ll want to launch your Remote Desktop app (there is a native one installed on your PC, or you may want to download it from the Windows Store for a more touch-friendly experience). You should be able to setup a new connection using your full host name. Once connected, you can log in with your Windows user ID and password.
Starting and Stopping Your SAP ECC 6.0 IDES Server
I heartily recommend keeping your server up and running for as long as possible, but there will come a time when you will need to manually take your server down to install updates or bring it back up to recover from a power outage. It happens. I’m still looking into the best way to accomplish these types of activities, but here is what I typically do:
Bringing it down
- Log out of all SAP sessions.
- Within the SAP Management Console, select your system and click the stop button (looks like a square).
- In the resulting pop-up, select the ‘soft’ option to ‘drain’ the instance before stopping it and click ‘OK’. I’ll be honest: I have no idea what this means.
- After a while, you will notice that the system icons have traded their happy green color for a drab gray color. This should indicate that the SAP system is down.
Bringing it up
- After your server is back online, you should first confirm that the ‘Oracle Listener’ service is started. After rebooting, I frequently find that it is not started. To check the listener:
- In the start menu, search for “services”. Select the “Services” option with the gears icon next to it.
- In the services list, find the “OracleOraDB12Home1TNSListener” item.
- If the status is “Started”, you’re good to go. If not, then select it and click the Start/Play button or right-click it and select “Start”.
- Now, launch your SAP Management Console.
- Select your System ID and click the Start/Play button. It may prompt you for a timeout duration — the default should be fine. In a few minutes, you should notice your system is green and ready for action.
This is one of those topics that I don’t have much confidence in. So far, I’ve stopped and started my server numerous times — including times when Windows 10 decides to restart the host machine unexpectedly. If anyone knows of a better way to Start/Stop a standalone SAP server, please let me know in the comments.
NOTE: If this is a dedicated SAP server, you may want to change the Oracle Listener service to start automatically. Just double-click on the service, change the “Startup Type” field to “Automatic”, and click “OK”. The next time the system starts up, it should start the service automatically.
WRAP-UP
Phew! There’s a lot going on with this SAP ECC 6.0 IDES Server thing. Hopefully, this appendix will provide some additional info to help you make the best use of your new server. As always, I’d love to hear feedback if you found some use in this series; please leave a question or comment below. Thanks for reading.
Leave a Reply